|
|
实验项目名称:
设备驱动: Linux系统下的字符设备驱动程序编程
一、实验目的
通过一个简单的设备驱动的实现过程。学会Linux中设备驱动程序的编写。
深入理解内核驱动模块编写和编译过程。
二、实验内容
1、编写一个字符设备驱动程序,并在设备的打开操作中打印主次设备号;
2、编写一个用户测试程序,实现设备的读操作。
三、实验涉及的系统调用函数以及内核函数
1、分配设备号函数register_chrdev( ),用于指定设备号的情况。函数原型为:
int register_chrdev(unsigned int major, const char *name,struct file_operations *fops);
major:主设备号(已知)
name:设备名
fops:设备操作方法 动态申请设备号函数alloc_chrdev_region,函数原型:
int alloc_chrdev_region(dev_t *from,unsigned int firstminor,unsigned int count,char *name)from:调用该函数后自动分配得到的设备号
firstminor:第一个次设备号 (一般为0)
count:要分配的设备数
name:设备名
该函数会调用_register_chrdev_region这个函数
2、从系统注销字符设备函数unregsiter_chrdev,函数原型为:
int unregister_chrdev(unsigned int major, const char *)
major:主设备号
name:设备名
unregister_chrdev_region是unregsiter_chrdev的升级版,2.6以上内核使用
void unregister_chrdev_region(dev_t dev, unsigned int count);
dev为设备号,和注册时候的要一致
count为申请的次设备个数。
文章福利】小编推荐自己的Linux内核技术交流群:【1143996416】整理了一些个人觉得比较好的学习书籍、视频资料共享在群文件里面,有需要的可以自行添加哦!!!(含视频教程、电子书、实战项目及代码)
资料直通车:最新Linux内核源码资料文档+视频资料
学习直通车:Linux内核源码/内存调优/文件系统/进程管理/设备驱动/网络协议栈
3、分配设备空间函数cdev_alloc,函数原型:
struct cdev *cdev_alloc(void)
主要针对需要空间申请的操作
4、对设备空间进行初始化和赋值操作函数cdev_init,函数原型:
void cdev_init(struct cdev *cdev, const struct file_operations *fops)
cdev:函数cdev_alloc分配的设备空间结构体指针
fops:对设备的操作
5、把设备添加进系统函数cdev_add,使用cdev_add注册字符设备前应该先调用register_chrdev_region或alloc_chrdev_region分配设备号。函数原型:
int cdev_add(struct cdev* dev,dev_t num,unsigned int count)
dev:字符设备结构体
num:设备号
count:添加的设备号的数量,具体的就是minor的数量
6、删除设备cdev_del,函数原型:
void cdev_del(struct cdev *dev)
dev:字符设备结构体
四、实验原理与重点
字符设备是指只能一个字节一个字节读写的设备,不能随机读取设备内存中的某一数据,读取数据需要按照先后顺序。字符设备是面向流的设备,常见的字符设备有鼠标、键盘、串口、控制台和LED设备等。每一个字符设备都在/dev目录下对应一个设备文件。linux用户程序通过设备文件(或称设备节点)来使用驱动程序操作字符设备。一个字符设备都有一个主设备号和一个次设备号。主设备号用来标识与设备文件相连的驱动程序,用来反映设备类型。次设备号被驱动程序用来辨别操作的是哪个设备,用来区分同类型的设备。
1、描述字符设备的数据结构
在Linux 2.6内核中的字符设备用cdev结构来描述,其定义如下:
struct cdev
{
struct kobject kobj; //类似对象类,驱动模块的基础对象
struct module *owner; //所属内核模块,一般为THIS_MODULE
const struct file_operations *ops; //文件操作结构
struct list_head list;
dev_t dev; //设备号,int 类型,高12位为主设备号,低20位为次设备号
unsigned int count;
};2、字符设备驱动模块的编写
实现一个基本的字符驱动设备需要以下几个部分:字符设备驱动模块的加载、卸载函数和file_operations结构中的成员函数。具体步骤如下:
(1)分配和释放设备号
在设备驱动程序中,注册设备前首先要向系统申请设备号,
分配设备号有静态和动态的两种方法:
- 静态分配(register_chrdev_region()函数)
- 动态分配(alloc_chrdev_region())
通过 unregister_chrdev_region()函数释放已分配的(无论是静态的还是动态的)设备号。
(2)定义并初始化一个struct file_operations结构,并实现其中的操作函数
static struct file_operations cdrv_fops = {
.owner=THIS_MODULE, /* 这是一个宏,推向编译模块时自动创建的__this_module变量 */
.open=cdrv_open,
.read=cdrv_read,
.write=cdrv_write,
};
static int cdrv_open(struct inode *inode, struct file *filp)
static ssize_t cdrv_read(struct file *filp, char __user *buf, size_t size, loff_t *ppos)
static ssize_t cdrv_write(struct file *filp, const char __user *buf, size_t size, loff_t *ppos)(3)字符设备的注册
(4)删除字符设备
(5)注销设备号
(6)模块声明 MODULE_LICENSE(“GPL”);
(7)加载模块 module_init(cdrv_init);
(8)卸载模块module_exit(cdrv_exit);
3、编译模块Makefile文件
4、利用mknod命令在/dev目录下为字符设备生成对应的节点
五、原始数据、结果与分析
device_driver.c
#include<linux/kernel.h>
#include<linux/module.h>
#include<linux/fs.h>
#include<linux/uaccess.h>
#include<linux/init.h>
#include<linux/cdev.h>
#define DEMO_NAME &#34;my_demo_dev&#34;
static dev_t dev;
static struct cdev* demo_cdev;
static signed count=1;
static int demodrv_open(struct inode* inode, struct file* file)
{
int major=MAJOR(inode->i_rdev);
int minor=MINOR(inode->i_rdev);
printk(&#34;%s: major=%d, minor=%d\n&#34;,__func__, major, minor);
return 0;
}
static ssize_t demodrv_read(struct file* file, char __user* buf, size_t lbuf,loff_t* ppos)
{
printk(&#34;%s enter\n&#34;,__func__);
return 0;
}
static ssize_t demodrv_write(struct file* file, const char __user* buf, size_t count, loff_t* f_pos)
{
printk(&#34;%s enter\n&#34;,__func__);
return 0;
}
static const struct file_operations demodrv_fops={
.owner=THIS_MODULE,
.open=demodrv_open,
.read=demodrv_read,
.write= demodrv_write,
};
static int __init simple_char_init(void)
{
int ret;
ret=alloc_chrdev_region(&dev,0,count,DEMO_NAME);
if(ret)
{
printk(&#34;failed to allocate char device region\n&#34;);
return ret;
}
demo_cdev=cdev_alloc();
if(!demo_cdev)
{
printk(&#34;cedv_alloc_failed\n&#34;);
goto unregister_chrdev;
}
cdev_init(demo_cdev, &demodrv_fops);
ret=cdev_add(demo_cdev, dev, count);
if(ret)
{
printk(&#34;cdev_add failed\n&#34;);
goto cdev_fail;
}
printk(&#34;successed register char device: %s\n&#34;, DEMO_NAME);
printk(&#34;Major number=%d, Minor number=%d\n&#34;, MAJOR(dev), MINOR(dev));
return 0;
cdev_fail:
cdev_del(demo_cdev);
unregister_chrdev:
unregister_chrdev_region(dev, count);
return ret;
}
static void __exit simple_char_exit(void)
{
printk(&#34;removing device\n&#34;);
if(demo_cdev){
cdev_del(demo_cdev);
}
unregister_chrdev_region(dev, count);
}
MODULE_LICENSE(&#34;GPL&#34;);
module_init(simple_char_init);
module_exit(simple_char_exit);Makefile
obj-m:= device_driver.o
CURRENT_PATH:= $(shell pwd)
LINUX_KERNEL:= $(shell uname -r)
LINUX_KERNEL_PATH:=/usr/src/linux-headers-$(LINUX_KERNEL)
all:
make -C $(LINUX_KERNEL_PATH) M=$(CURRENT_PATH) modules
clean:
make -C $(LINUX_KERNEL_PATH) M=$(CURRENT_PATH) clean用户测试程序test.c
#include<stdio.h>
#include<unistd.h>
#include<fcntl.h>
#include<stdio.h>
#define DEMO_DEV_NAME &#34;/dev/demo_drv&#34;
int main()
{
char buffer[64];
int fd;
fd=open(DEMO_DEV_NAME, O_RDONLY);
if(fd<0)
{
printf(&#34;open device %s failed\n&#34;, DEMO_DEV_NAME);
return -1;
}
read(fd,buffer,64);
close(fd);
return 0;
}make编译

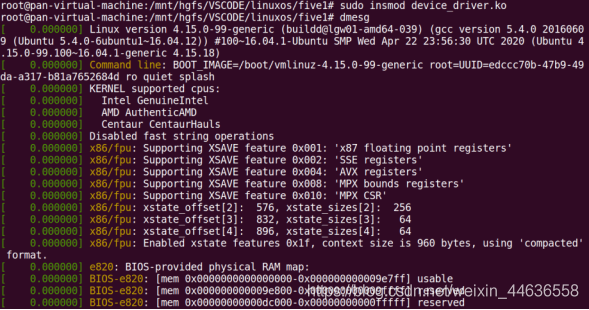
装载并查看系统信息
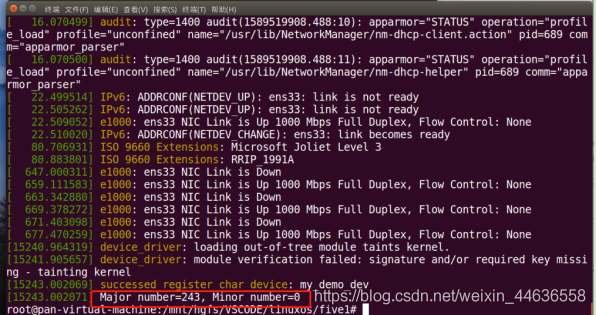
打印出主设备号
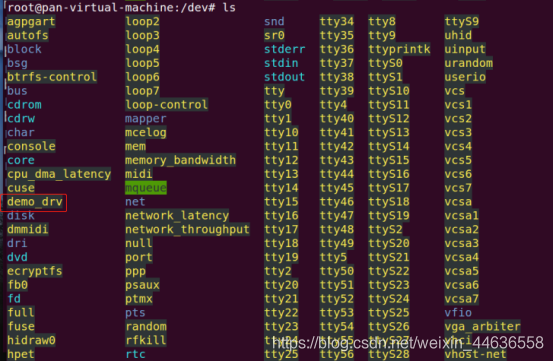
在/dev目录下生成对应的结点

查看/dev目录情况
用户测试程序
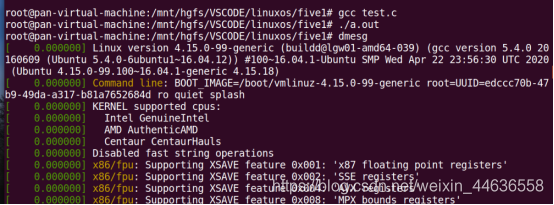
实现设备的读操作

原文链接:https://blog.csdn.net/weixin_44636558/article/details/106448800 |
|